


Outlet repair is an essential home maintenance task because a damaged, loose, warm, buzzing, or non-working electrical outlet can affect appliance performance and create a serious safety risk. A wall outlet connects household wiring to devices, so its condition directly influences power flow, grounding, circuit protection, and fire prevention. Proper repair starts with identifying the problem, shutting off power, inspecting the receptacle, checking wiring, replacing damaged parts, and testing the outlet before use.
Identify the Outlet Problem Before Starting Repairs
The first step in outlet repair is to recognize the exact symptom. An outlet may stop working, feel loose, spark when a plug is inserted, make a buzzing sound, show burn marks, or fail to hold plugs securely. Each symptom points to a different issue, so accurate inspection helps prevent unnecessary replacement and reduces the chance of missing a dangerous wiring fault.
A dead outlet may be connected to a tripped breaker, a blown fuse, a tripped GFCI outlet, a loose wire, or a failed receptacle. A loose outlet usually means the mounting screws, electrical box, or internal contacts are worn. A warm outlet may indicate overload, poor wire connection, or an undersized device. Burn marks usually mean arcing occurred, and that condition requires immediate attention.
Outlet problems can also appear in groups. For example, several outlets on the same wall may stop working because one upstream GFCI outlet tripped. In older homes, worn receptacles may fail because internal metal contacts lose tension over time. In kitchens, bathrooms, garages, laundry rooms, and outdoor spaces, moisture and GFCI protection are common factors in outlet performance.
| Outlet Symptom | Possible Cause | Recommended Action |
| Outlet has no power | Tripped breaker, tripped GFCI, loose wire | Reset protection, inspect wiring |
| Plug falls out | Worn receptacle contacts | Replace outlet |
| Outlet feels warm | Overload or loose connection | Stop use and inspect |
| Sparks appear | Arcing or damaged wiring | Turn off power and repair |
| Buzzing sound occurs | Loose wire or failing outlet | Replace or call electrician |
| Burn marks appear | Heat damage or arcing | Replace outlet and inspect wires |
Shut Off Power at the Electrical Panel
Power must be turned off before outlet repair begins. The correct breaker controls the circuit that feeds the outlet, and switching it off prevents electric shock while removing the cover plate, loosening screws, or touching wires. Never rely only on a wall switch because many outlets remain energized even when nearby switches are off.
Start by plugging in a lamp, radio, or outlet tester to confirm the outlet has power. Then turn off the suspected breaker at the electrical panel. After switching off the breaker, test the outlet again. The device should turn off, and a non-contact voltage tester should show no live voltage. If power remains, another breaker controls the outlet.
Electrical panels may be labeled incorrectly, especially in older houses or renovated rooms. When labels are unclear, test carefully and avoid touching conductors until voltage is confirmed absent. If multiple circuits enter the same electrical box, one breaker may not shut off every wire inside the box. In that case, professional help is safer.
Gather the Right Tools and Replacement Parts
Outlet repair requires basic electrical tools and properly rated replacement parts. A typical repair uses a flathead screwdriver, Phillips screwdriver, non-contact voltage tester, outlet tester, wire stripper, needle-nose pliers, electrical tape, and a replacement receptacle. The replacement outlet must match the circuit rating and intended location.
Most household outlets are either 15-amp or 20-amp receptacles. A 15-amp outlet has two vertical slots and a grounding hole. A 20-amp outlet has one T-shaped slot. The circuit breaker and wire size determine which outlet is appropriate. A GFCI outlet is required in many wet or damp locations because it shuts off power when it detects current leakage.
Replacement parts should also match the outlet function. Standard receptacles work in dry rooms. Tamper-resistant receptacles protect children by blocking foreign objects. Weather-resistant receptacles suit outdoor and damp locations when used with proper covers. AFCI or GFCI protection may be needed depending on room type and local electrical rules.
| Location | Recommended Outlet Type | Key Feature |
| Bedroom or living room | Tamper-resistant standard outlet | Everyday plug safety |
| Kitchen countertop | GFCI outlet | Shock protection near water |
| Bathroom | GFCI outlet | Required moisture protection |
| Garage | GFCI outlet | Protection for tools and appliances |
| Outdoor area | Weather-resistant GFCI outlet | Moisture and weather protection |
| Laundry room | GFCI outlet | Protection near water and machines |
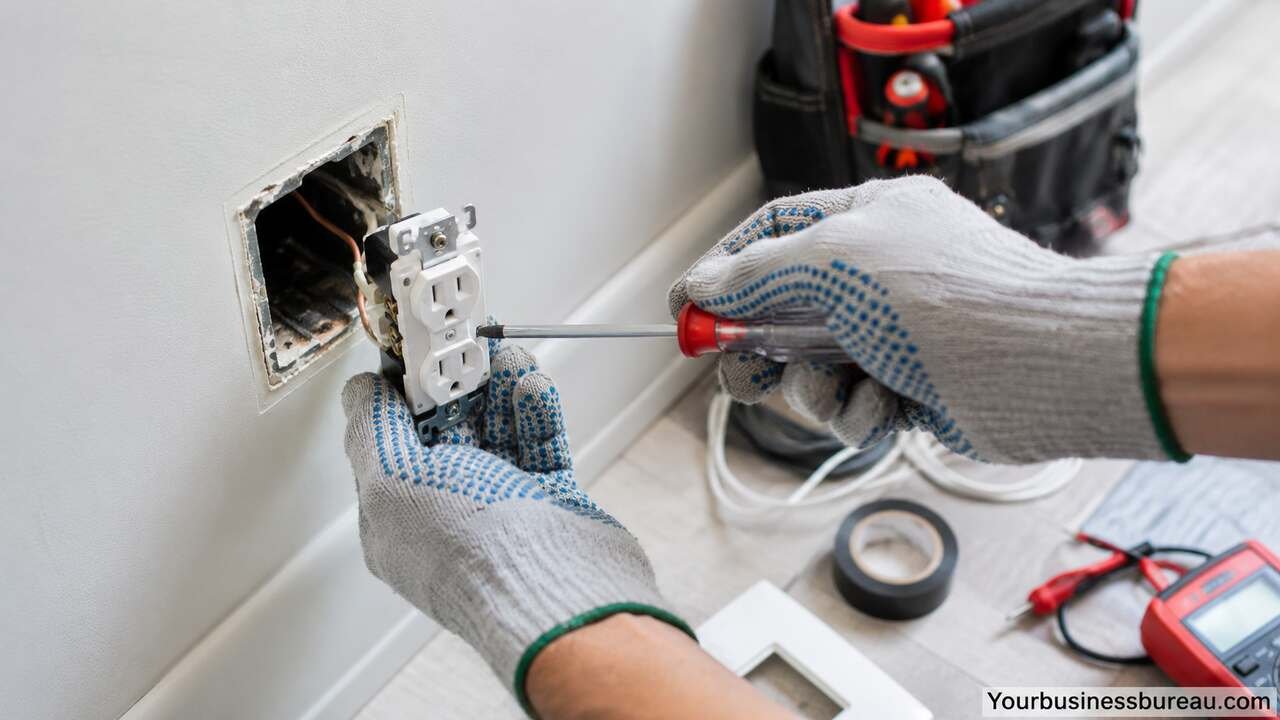
Remove the Outlet Cover and Inspect the Receptacle

After power is confirmed off, remove the outlet cover plate. The cover plate protects the wiring area and holds the outlet opening in a finished position. Once removed, the receptacle mounting screws become visible. Loosen these screws and gently pull the outlet forward from the electrical box.
Inspect the outlet body, screw terminals, wire insulation, and electrical box. Look for blackened areas, melted plastic, cracked housing, loose screws, exposed copper, or damaged insulation. A healthy outlet should have tight connections, clean terminals, and no heat damage. If the outlet is cracked or burned, replacement is the correct repair.
The wiring layout matters. The black or red hot wire usually connects to the brass terminal. The white neutral wire connects to the silver terminal. The bare copper or green ground wire connects to the green grounding screw. If the outlet has two cables, it may feed power to other outlets downstream.
Tighten Loose Connections Correctly
Loose wiring is a common cause of outlet failure. A loose terminal creates resistance, and resistance produces heat. Heat can damage insulation, weaken the outlet body, and cause arcing. Tightening the connection can restore safe contact when the outlet and wires are otherwise in good condition.
Check each screw terminal by gently testing whether the wire is secure. If a wire moves, loosen the screw, reshape the wire hook if needed, place it clockwise around the terminal screw, and tighten firmly. The wire insulation should sit close to the terminal without copper extending too far outside the connection.
Avoid using damaged backstab connections when repairing an outlet. Backstab holes can loosen over time. Side screw terminals usually provide a stronger connection. If the outlet shows wear, replacing it is better than reusing a weak device.
Replace a Damaged or Worn Outlet
A damaged outlet should be replaced rather than patched. Replacement restores plug grip, terminal strength, grounding reliability, and safe power delivery. This repair is common when plugs fall out, the outlet face is cracked, or the receptacle has visible heat damage.
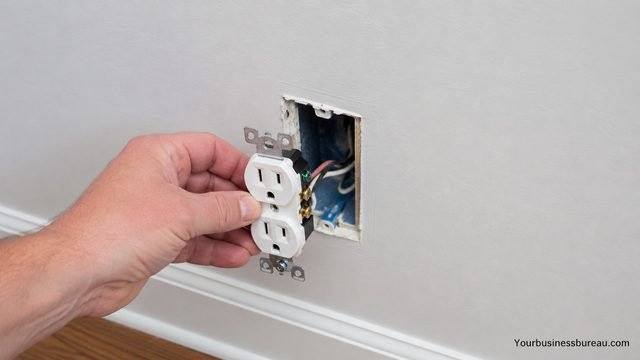
Remove one wire at a time from the old outlet and connect it to the matching terminal on the new outlet. Hot wires go to brass screws. Neutral wires go to silver screws. Ground wires go to the green screw. If the outlet is controlled by a wall switch or has a broken tab between terminals, copy the original configuration carefully.
Push the wires back into the electrical box without sharp bends. Mount the outlet straight, tighten the mounting screws, and install the cover plate. The outlet should sit flush with the wall and should not move when a plug is inserted or removed.
Repair a Loose Outlet in the Wall
A loose outlet can damage plug blades and strain wires behind the wall. The outlet should be firmly attached to the electrical box, and the box should be secure inside the wall. Movement during use can loosen terminals and create long-term safety problems.
If the receptacle wiggles, tighten the mounting screws. If the outlet still sits recessed or unstable, outlet spacers may be needed to bring it flush with the wall surface. If the electrical box itself moves, the box may need to be tightened, repaired, or replaced.
Loose outlets are common after drywall repairs, tile installation, or repeated plug use. A secure outlet improves contact pressure and reduces stress on the wiring. Never rely on the cover plate alone to hold the outlet in position.
Reset and Test GFCI Outlets
A GFCI outlet protects people from shock by shutting off power when it detects an imbalance in current. When a bathroom, kitchen, garage, basement, or outdoor outlet stops working, a tripped GFCI is often the cause. The reset button restores power only after the fault is cleared.
Press the reset button on the GFCI outlet. If it clicks and power returns, test the outlet with the test button and reset it again. If it immediately trips, moisture, a faulty appliance, downstream wiring, or a failed GFCI device may be responsible.
Some standard outlets receive power from a GFCI located elsewhere. A tripped GFCI in a garage may shut off an outdoor outlet. A bathroom GFCI may protect another bathroom outlet. Always check nearby and upstream GFCI outlets before replacing a dead receptacle.
Check the Circuit Breaker and Load Demand

A tripped breaker indicates that the circuit experienced overload, short circuit, or ground fault conditions. Resetting the breaker may restore power, but repeated tripping means the circuit has an unresolved problem. Outlet repair should include checking what devices use the same circuit.
High-demand appliances, space heaters, microwaves, hair dryers, and power tools can overload a circuit. When too many devices draw power at once, the breaker opens to prevent overheating. If an outlet fails while a heavy appliance is running, load demand may be the root cause.
Do not replace a breaker with a larger one to stop tripping. The breaker protects the wire inside the wall. Oversizing the breaker can allow wiring to overheat. If the circuit cannot support the required load, a dedicated circuit may be needed.
Replace Burned or Heat-Damaged Components
Burn marks, melted plastic, and scorched wires indicate overheating or arcing. This condition should be treated seriously. The outlet should not be used until damaged parts are replaced and the wiring is inspected. Heat damage can extend beyond the visible receptacle.
Cut back damaged wire only if enough safe wire length remains in the box. Strip fresh insulation and connect the clean copper to a new receptacle. If the wire is too short, brittle, or burned deep into the cable, an electrician should evaluate the circuit.
Heat damage often results from loose terminals, worn plug contacts, overloaded circuits, or poor-quality connections. Replacing only the cover plate does not solve the problem. The electrical path must be restored with clean, tight, correctly rated components.
Confirm Grounding and Polarity
Proper grounding and polarity make an outlet safer and more reliable. Grounding provides a fault path that helps protective devices operate. Correct polarity ensures the hot and neutral wires connect to the proper terminals. A miswired outlet may still power devices but remain unsafe.
Use a plug-in outlet tester after reassembly. The tester lights indicate correct wiring, open ground, reversed polarity, open neutral, or other common faults. If the tester shows a wiring error, turn off power again and correct the connections.
Older homes may have two-prong outlets or ungrounded wiring. Replacing a two-prong outlet with a three-prong outlet without proper grounding can create a false sense of safety. In those cases, GFCI protection or rewiring may be required.
Reinstall the Outlet and Restore Power
After connections are secure, fold the wires neatly into the electrical box. The outlet should fit without forcing wires against sharp edges. Tighten the mounting screws until the receptacle is stable and aligned. Install the cover plate so it sits flat against the wall.
Turn the breaker back on and test the outlet. Plug in a small device or use an outlet tester to confirm power. Check that plugs fit firmly, the outlet does not move, and no buzzing, heat, odor, or sparking occurs.
Monitor the outlet during the first use after repair. A properly repaired outlet remains cool, holds plugs securely, and delivers steady power. If the outlet heats up or the breaker trips again, stop using the circuit and have it inspected.
Call a Licensed Electrician for Unsafe Conditions
Some outlet repair problems require professional service. Call an electrician when wires are burned deep inside the box, the outlet sparks repeatedly, the breaker trips again after repair, aluminum wiring is present, the box contains confusing wire combinations, or power remains live after the breaker is off.
Professional electricians can test voltage, load, grounding, insulation condition, and circuit continuity. They can also replace damaged boxes, add GFCI protection, install dedicated circuits, and correct unsafe wiring from previous repairs.
DIY outlet repair is reasonable for simple receptacle replacement when power is fully off and wiring is clear. However, electrical systems carry shock and fire risks. Safety should always come before speed or cost savings.
Conclusion
Outlet repair protects the home by restoring safe power flow, secure plug contact, correct grounding, and reliable circuit operation. The best repair process starts with diagnosis, continues with power shutoff and careful inspection, and ends with proper testing. A loose, dead, warm, burned, or sparking outlet should never be ignored because small electrical problems can become serious hazards. When the repair involves damaged wiring, repeated breaker trips, or uncertainty, a licensed electrician is the safest choice.
If you want to explore how we help businesses grow from the ground up, you can visit yourbusinessbureau.com to see what we offer.
FAQ’s
Yes, simple outlet replacement can be a DIY task when power is turned off and the wiring is clear. Call an electrician if wiring is damaged, confusing, burned, or still energized.
A tripped GFCI outlet, loose wire, failed receptacle, or upstream connection problem may cause this issue. Check nearby GFCI outlets first.
Yes, a warm outlet can indicate overload, loose wiring, or failing contacts. Stop using it and inspect the outlet.
Basic repair usually involves testing power, removing the receptacle, tightening or replacing connections, installing a new outlet if needed, and testing the result.
A tiny spark during plug insertion can happen occasionally, but repeated sparks, loud pops, burn marks, or odors are warning signs. Turn off power and repair or replace the outlet.
Outlets should be replaced when they are loose, cracked, burned, unable to hold plugs, outdated, or no longer meet the safety needs of the room.


